Showing posts with label ingredients. Show all posts

Wednesday, 25 July 2012

My Mum's Strawberry Jam


I just love using my Granny's old brass jam pan when I make jams and chutneys - there is nothing quite like it! It's over 100 years old and will have seen some concoctions in it's time. Here's my favourite recipe for Strawberry Jam.


Ingredients

2lbs strawberries - slightly underripe is fine
1 1/2lbs preserving sugar
Juice of 2 large lemons
Knob of butter
(Liquid pectin if you feel the need)

Method

  • Wipe and hull strawberries using the Core 'n More.
  • Cut the strawberries on the Cutting Board using the Utility Knife and layer with sugar in jam pan.
  • Squeeze juice using the Citrus Press and add lemon juice.
  • Cover with tea towel and leave overnight so sugar draws the juice from the fruit and dissolves.
  • Next day, slowly heat until sugar fully dissolves.
  • Add a knob of butter as this will disperse some of the scum.
  • Bring to rolling boil for 5 - 10 minutes or until, when tested on a cold saucer, the jam wrinkles.
  • Skim off the scum if necessary.
  • If you need to add additional pectin, remove from heat for a few minutes and stir in prescribed quantity.
  • Let stand for 15 minutes so the fruit doesn't sink when you bottle it.
  • Whilst the jam is standing, heat the clean jars in the oven to sterilise them.
  • Ladle the hot jam into the hot jars. (Using a jam funnel makes transferring the hot jam safer and cleaner!)
  • Top the jam with a waxed disc (you can dip it in brandy first if you feel the need - personally I would drink the brandy and just use the wax disc, but each to their own!!!)
  • Put the lid on and leave to cool - the shelf life is 2 years but I bet it doesn't stay there that long.....

Saturday, 31 March 2012

Easter - eggs, bunnies and more!

Easter is one of my favourite holidays.  I love the traditions that go with it, the food (naturally),  family and friends getting together and sharing time eating, chatting and playing.  Easter eggs started off as birds eggs being painted and traditionally were rolled.  More exotic eggs were given as gifts between members of the Russian royal family which had been created by the famous jeweller Faberge.  Whilst I can't quite stretch - as much as I would like to - to the most exquisite bejewelled gifts, chocolate eggs will do us just fine!


As a family we decorate the shells of hardboiled eggs and make an Easter tree on the Easter weekend, then after Easter Monday lunch we find a suitable hill and roll the eggs.  To determine the winner you need to see whose egg goes the furthest, survives the most number of rolls or is rolled between two posts or pegs.  Of course, the Easter Bunny has to come and visit and, weather dependent, hide the eggs for the Easter Egg Hunt in the garden or house.

Easter is a Christian celebration and you can learn more about the traditions in the UK from this wonderful site, by Mandy Barrow, British Life and Culture

 Low fat - easy to make and scrummy!

  Low fat recipe - Hot Crossed Buns

recipe by: www.caloriecount.about.com

Ingredients
  • 1 pkg dried yeast
  • 1/4 cup sugar
  • 1/2 tsp dried cinnamon
  • 3/4 cup warmed skimmed milk
  • 2 cups plain flour
  • 1/2 tsp salt
  • 1/2 tsp all spice
  • 2 tbsp canola oil / low fat margarine
  • 1 egg, beaten
  • 1/2 cup raisins
Paste for Crosses
  • 2 tbsp plain flour
  • 2 tbsp water
  • 1 tbsp sugar
Glaze
  • 1 tbsp hot water
  • 1 tbsp sugar
  • 1/4 tsp all spice
Directions
  1. In Small Batter Bowl, combine yeast with 1 tbsp sugar and warmed skim milk. Stir until yeast and sugar are totally dissolved. Cover and stand in a warm place for 10 minutes, until bubbly.
  2. In another bowl, combine remaining sugar with flour, salt and spices. Rub in margarine, then include the yeast and milk mixture, egg and raisins. Using Small Mix n Scraper mix well, cover the bowl and let mixture rise for 30 miutes in a warm place. Transfer to a floured surface and knead until smooth.  This mix is quite wet so you may need some additional flour.
  3. Divide the dough into 8 pieces and knead pieces into round shapes. Place buns into a well-greased 8" square cake tin. Let rise in a warm place for 10 minutes.
  4. Paste for crosses: Mix flour water and sugar. Transfer to a plastic bag, cut the corner and make the crosses. Bake in oven for 15-20minuts at 410F.
  5. Glaze: mix all the ingredients in a Small Micro Cooker. Cover over a low heat until dissolved, or place in microwave for 30 seconds on high- stir well. Until the sugar has dissolved while buns are still hot, using the Chefs Silicone Basting Brush, glaze the baked buns.
Makes 8

Cooks tip:  If you double the ingredients you can still use just 1 egg


Thursday, 22 March 2012

Mother Knows Best!

Granny's jam pan!
When I was a little girl I used to pretend to be on TV presenting a cooking programme!  Strange how things turn out as, ironically, that's just what I do for a living - although not on TV.....  I would sit at the kitchen table and "present" to my mum whilst she prepared dinner.  Whilst she said she was a "boring" cook I would redefine that to be a "plain" cook.  A skill in itself is to be able to assemble a tasty meal from - what appear to be - bits of this and that left in the larder. 

I enjoy cooking with my kids and hope that I can pass on some of my Granny's wisdom and that of my mum.  In fact, only today I was looking for a recipe when I came across an old recipe collection - I had forgotten it was there.  To my delight on the inside cover my mother's name before she married and a wide selection of recipes ranging from war-time favourites including Mock Cream and Apple Dumplings through to more modern additions of how to cook spaghetti!

Lists of the amounts of sugar required for jam making and sauces traditionally served with meats alongside meats and poutlry in season, including Hare, Partridge, Grouse and English Plover.  Fantastic!

Inspired by my memories of my childhood and mums kitchen I made marmalade!

Beautiful, sunny, happy day - I love days like this...

Sheila's Saville Orange Marmalade

Seville oranges as required. 12 is a good number and makes about 10lbs when finished.
To each pound of fruit allow 2 pints water.  Weigh again when cooked and cut up and allow 1 lb of sugar to 1lb  of fruit and water.

Method:

  • Wipe and weigh oranges.
  • Put them into a preserving pan with the water.
  • Cover the fruit with a large place, to keep them under the water and boil them for 11/2 hours.
  • Leave until next day in the water then remove oranges from liquid.
  • Cut into quarters, scrape out the pulp, soft pith and rub through a sieve.
  • Boil pips in a saucepan with 1 pint water until reduced to about half.  Add to this whatever pulp is left after rubbing through the sieve.
  • Strain it off and add to the water in which the oranges were boiled.
  • Add sieved pulp and peel cut into thin strips.
  • Weigh and add sugar and cook slowly until dissolved, then bring to a rolling boil.
  • Boil until it will jelly when cold, keeping it stirred and when nearly ready remove any scum that may be on top.

Tip:  An easy way is to weigh preserving pan or bowl and weigh liquid in it, then add sugar accordingly.

Carol's version:

Method:


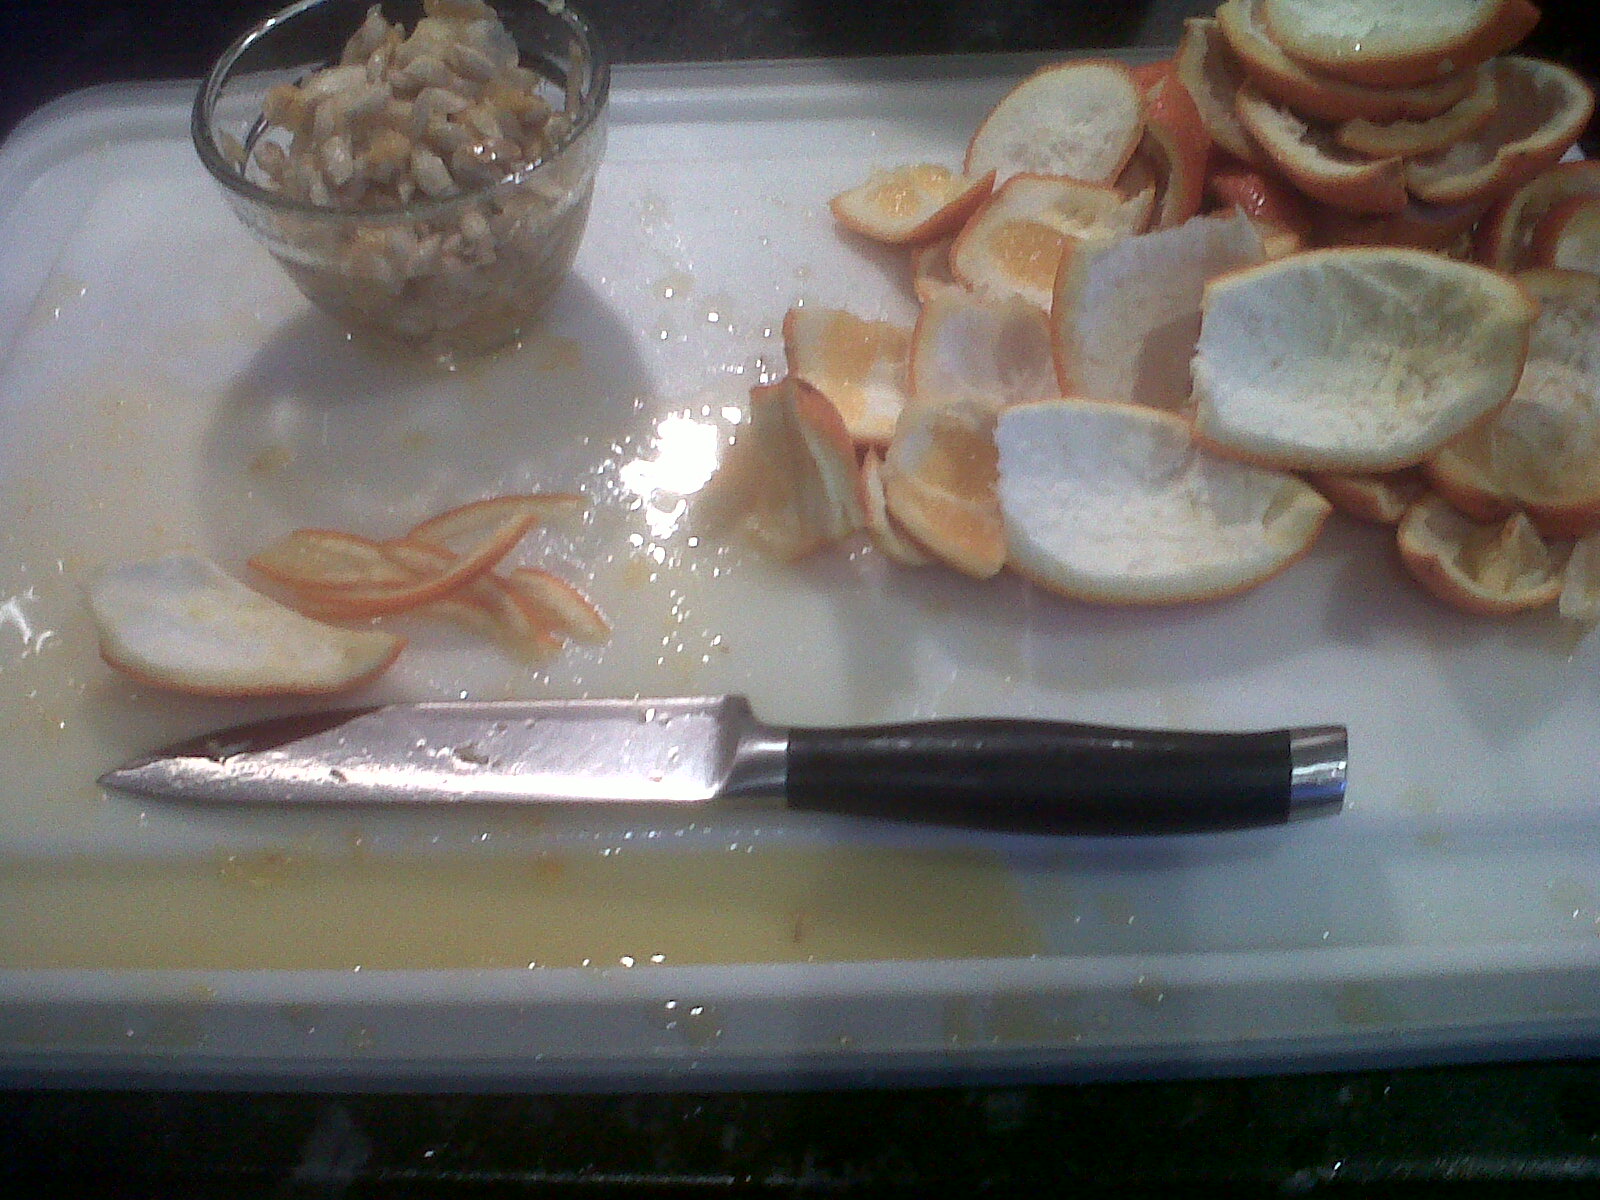
  • On Large Grooved Cutting Board, quarter oranges using Utility Knife, remove fruit pulp and chop. 
  • Place skins to one side.
  • Put pulp in bowl and seperate out pips - place pips in Small Batter Bowl.
  • Take half the skins and cut into thin strips - add to fruit pulp.
  • Cover pips with water.  Leave everything overnight.
  • Weigh fruit and allow 2 pints of water per 1 lb of fruit. Add 1 lb sugar per 1 lb fruit.
  • Strain pips and gather all jelly and strained liquid - use this in your liquid allowance.
  • Put fruit, sugar and liquid into preserving pan.
  • Add juice of 2 lemons.
  • Bring to boil, stirring and then allow to bubble well (rolling boil)

Tip:

Push the cooled liquid with your finger and it should wrinkle
  • To test if setting point has been reached, chill a plate in the fridge or freezer, drop a small amount of liquid on it and when cold push the liquid with your finger - if it wrinkles then it is ready, if not boil for longer!
Hot liquid = hot jars!
  • Warm jars in oven and then ladle warm marmalade in - if you use a jam funnel it makes it easier.


Friday, 9 March 2012

Strawberry Fromage Fraise Cheesecake


Even though this is a scrummy weekend recipe is not as wicked as it looks!

Debbie from Slimming World was kind enough to share this recipe with me.  It contains 6 Syns per serving in Red, Green or Extra Easy! (Is that some sort of secret language?)
  
Serves: 8

113g/4oz ginger nut biscuits
28g/1oz butter, melted
1 sachet + 2 level tsp gelatine
5 tbsp boiling water
227g/8oz strawberries
340g/12oz Quark (skimmed milk soft cheese)
227g/8oz fat-free natural fromage frais
Artificial sweetener, to taste
Strawberries, for decoration

Method

  • Using the Food Chopper, crush the biscuits with a and then mix in the melted butter. Press evenly over the base of a 20 cm/8 in Springform Pan and pop into the fridge to chill while you make the filling.
  • Dissolve the gelatine in the boiling water, stirring it well, and then leave it until it is cool.
  • Meanwhile, purée the strawberries quickly in the Manual Food Processor or mash roughly using the Mix n Masher – the purée should have some texture and not be too liquid.
  • In a bowl, beat together the Quark and fromage frais and, using the Small Mix n Scraper, fold in the puréed strawberries and the cooled gelatine, mixing well. Sweeten to taste with artificial sweetener.
  • Spoon the cheesecake mixture over the chilled biscuit base and chill in the refrigerator until set (about 1 hour).
  • Serve sliced, decorated with strawberries.
Slimming World Tip:   
  • You could save 1½ Syns per serving by mixing the crushed ginger nuts with a beaten egg white instead of using butter. However, it would have to be baked in a moderate oven for 10 minutes and then cooled before adding the cheesecake mixture.
  • Agar agar can be used instead of gelatine if preferred.

Thursday, 8 March 2012

Kids Chuck and Bung Veggie Curry


OK, so yesterday I was Wonder Woman! 


School run without hiccups; packed lunches remembered, ironing done, Jeremy Kyle watched (it makes me realise how good my life it compared to those muppets!), hoovered and found out when tickets for the local JLS concert are going on sale!  That was all completed just in time for 11am coffee!!


Kids in from school - my son announced "I only want fruit and vegetables for tea Mummy!" OK - like the idea, but I bet I'd choose the wrong ones.....  I suggested the children collected the veggies together they wanted to eat - to my amazement this was the result!


Vegetable Curry - we call it a Chuck and Bung dish (you chuck it all in a pan and bung it on the stove!)

Any veg you want to use - we chucked together:  Onion, Carrots, Broccoli, Mushrooms, Pepper, French Beans, Asparagas, Tomatoes, Spinach, Celery, Root ginger, Garlic
Other things we bunged in:  Dessicated coconut, Sultanas, Garam Masala, Chilli powder, Turmeric, Curry powder, Chopped tomatoes, Tomato paste, Honey
Optional:  Double cream or Natural Yoghurt

What we did:
On Cutting Board, chop onion using Chefs Knife, place in Stir-fry Skillet. 
With Food Chopper chop ginger and then crush garlic using Garlic Press - add to pan.  Toss in a couple of handfuls of dessicated coconut and saute.  Stir occasionally using Small Mix n Scraper until coconut is toasted (I wish you could smell this it's so good!)  If you need to 'hide' vegetables, the Food Chopper is a great tool to use (sneeky Mummy - I did with the Spinach!)
Add rest of chopped vegetables, chopped tomatoes, tomato paste, honey and sultanas.  Combine and bring to the boil.


Measure spices using Adjustable Measuring Spoons.  For the rice use the fabulous Rice Cooker (I use it for everything and rice!!! More to follow on that in later posts...)  Measure 1 250ml Prep Bowl of rice and add 1.5 - 2 Prep Bowls of water.  Microwave as per rice packet instructions.  The insert in the lid of the Rice Cooker catches all the starch and leaves you with perfect results - every time!

Friday, 2 March 2012

Basic Muffin Mix

This fab Basic Muffin Mix recipe can so easily be adapted for many other Muffin recipes both sweet and savoury.  When I refer to the Basic Mix, this is it!

Ingredients:
  • Oil or meled butter for greasing
  • 280g plain white flour (up to 50% can be swapped out for plain wholemeal flour, bran, oats, oatmeal, oatbran, wheatgerm or polenta)
  • 1 tbsp baking powder
  • ½ bicarbonate of soda if using buttermilk or yoghurt
  • 1/8 teaspoon salt
  • 115g sugar (brown or white) – for savoury muffins omit the sugar
  • 2 medium eggs
  • 9 fl oz milk (can substitute buttermilk, yogurt, sour cream, cream, coconut milk, fruit juice or fruit puree)
  • 6 tbsp sunflower oil or 85g butter, melted and cooled
  • 1 tsp vanilla extract
This basic mix or "base recipe" can be used to adapt as required and you will see me refer to it in future postings.